Searchable Tree Prompts

While IBM is promising searchable tree prompts in Cognos 11.1.7 (hopefully), many cognos instances won’t upgrade to that soon. Also, it’s likely that prompt will only work in interactive mode, so a non-interactive mode prompt would be very useful.

The technique I’ve come up with doesn’t use any JavaScript, and works just as well for non-interactive mode. The only downside is that it involves refreshing the page, but the only query that changes should be query feeding the tree prompt, so it shouldn’t be too bad.

For the purposes of this post, I’ll build it in interactive mode.

To start, let’s build the structure of the search. Create a table with 2 rows, 2 columns, and merge the bottom two cells.

Top left: Drag in a text box prompt, parameter name: “ProductSearch”
Top right: Drag in a prompt button
Bottom: Drag in a tree prompt, parameter name: “Product”. Don’t select anything to feed the prompt, we’ll do that later.

When you’re done, it should look like this:
Structure

Now we have to define the data item feeding the tree prompt. In this case this is the code we want:

#prompt(
   'ProductSearch'
  , 'string'
  ,'[Sales (analysis)].[Products].[Products].[Product line]'
  ,'union(filter(descendants([Sales (analysis)].[Products].[Products].[Products],1,self beforewithmember after),lower(caption(currentMember([Sales (analysis)].[Products].[Products]))) contains lower('
  , ''
  , ')),'+promptmany('Product','mun','emptySet([Sales (analysis)].[Products].[Products])','set(','',')')+')'

)#

It seems complicated, so let’s go over step by step.

First, look at the ProductSearch parameter. If it is null, then take the Product line level from the hierarchy. This is the way tree prompts behave normally.

Next, if there is a value in ProductSearch, let’s filter the ENTIRE hierarchy looling for the specific string. If a user types in, “polar” the expression would look like:

filter(descendants([Sales (analysis)].[Products].[Products].[Products],1,self beforewithmember after),lower(caption(currentMember([Sales (analysis)].[Products].[Products]))) contains lower(‘polar’))

And finally, we union the already selected Products, if any, onto that set. On the first search it might look like:

union(filter(descendants([Sales (analysis)].[Products].[Products].[Products],1,self beforewithmember after),lower(caption(currentMember([Sales (analysis)].[Products].[Products]))) contains lower(‘polar’)),emptySet([Sales (analysis)].[Products].[Products]))

Assign that data item to the tree prompt, and let’s see it in action.

search tree working

It’s working, but it doesn’t look great. You can drag a text item into the prompt button, and resize things to make it a little more inline.

Report XML below
search-tree-report.xml (1114 downloads)

Guest Post: A New Take on Date Range Prompts

Since version 10.2 of IBM Cognos BI Suite, IBM included an API to access and manipulate prompt objects. Since prompt objects are the main instrument we use to allow users to communicate with a report (Interactivity or user selection), being able to manipulate them however we see fit can change user experience dramatically for the better. There are countless examples of how the prompt API can be used to achieve this. For example, dynamic defaults: Suppose you have two prompts, for region and for products. You want the default product selected to be the best selling product in the region selected. With prompt API, this can be achieved easily.

In this post I’d like to showcase one of the first solutions I ever wrote using Prompt API, because it was one of the things I wanted to solve for a long time.

Every so often we add “from date” and “to date” prompts to a report, to use for filtering the report output to show only data from the date range selected. The problem is, most users and most use cases don’t require the sort of flexibility a date range offers: most users will not run their sales-per-branch report between April 23rd and May 2nd, for instance, because it’s an arbitrary chunk of dates. Instead, users are likely to filter dates for last month, this MTD, QTD, YTD, last week and so on. So, basically, set, standard, comparable time frames. And sometimes the date range prompt can be replaced with a drop down list of such pre-set ranges, but other times, users ask to still have the flexibility of choosing to and from date, but nonetheless, still mostly use the set, comparable ranges.

Now, in order to select last month’s dates with two date prompts, your average user will need 6 clicks: One to open from date calendar, one to page back to last month, one to click on “1”, and the same process with the “To date” prompt. For YTD, they might need more. That’s a lot of clicks. Also, developers often have to write scripts to get the default value right, and because these date prompts are never done in a centralised, reusable manner, they end up writing a script for each report. I have long fought the war on developers wasting time by doing things more than once, and this case is no different. Even if reports require different default times, the solution can still be generalised, and therefore made reusable.

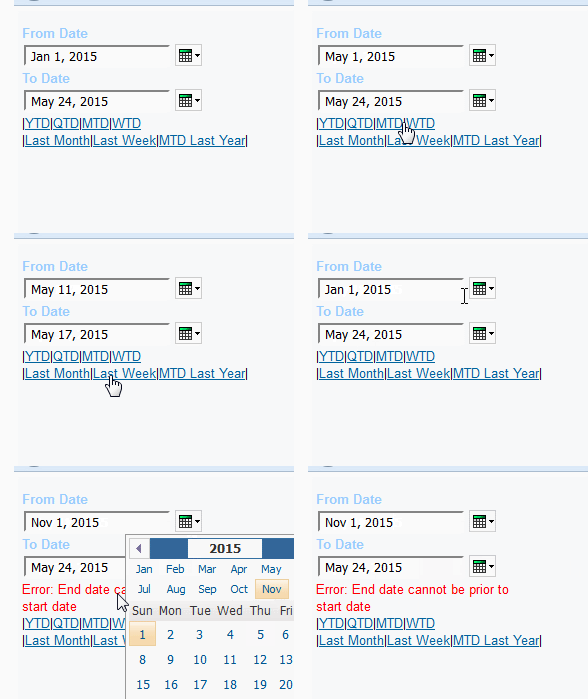
My solution uses JavaScript and Prompt API to add to the date prompt functionality. Here is how it works:

Date Solution

I’m using two date prompts, and adding 7 pre-defined links, which, when clicked, fill in their respective dates. So, for example, clicking on MTD will set the from date prompt to the 1st of the current month, and the to date prompt to today’s date. There’s also a verification mechanism in place to ensure that from date is always earlier than to date, or equal to it.

But how do I make this solution generalised? Let’s take a look at the report studio report:

RS Look

The bit in blue is the error message the user will get if they choose an end date that’s prior to the start date. The bit in blue is a text that should be replaced with another text – containing just one number between 1 and 7, corresponding with a dynamic ate range.  “1” is YTD, 4 is WTD and so on.

Now, if you drag in a layout reference object to this interface, here’s what you’ll get:

override

You can override&replace the warning message and the default text. So, if the default for a certain report is “last month”, you’ll override “Defaults”

replace

Drag in a text item and insert “5”

default set

When you run the report, the default would be last month:

final result

This way you can set a different default value for each report in a reusable manner.

I’m attaching the XML, of course, but pay attention to these caveats:

1. The script has seven preconfigured date ranges. You can change them or add to them as you require, and use the general example in the code, but it requires some knowledge of scripting. Unfortunately, I will not be able to provide support for such customisations.

2. If you’re relying on my script to manipulate weeks, pay attention that my script assumes Monday is the first day of the week. Israelis especially, this means you’ll have to change this logic (Weeks in Israel begin on Sundays).

3.This is 10.2.2 – You can downgrade it to 10.2.x by changing the version number at the top.


daterange.txt (9413 downloads)


Nimrod (Rod) Avissar is a Cognos expert, with a penchant for specialized UX solutions. Feel free to drop me a line! (LinkedIn).


Checking an “All” option in a checkbox prompt

One of my readers sent me an interesting problem. They need a checkbox prompt in which the top option is “All” and checking on any other option would automatically uncheck the “All” choice. Similarly, checking “All” should uncheck the other choices. Taking it to the conclusion, when checking or unchecking all of the options, the “All” should be checked.

Since they are still on 10.1, I have not used the Prompt API, meaning this should work on all versions since 8.4. To begin, the prompt itself.
check this out

In this case, the prompt is based on the Retailers hierarchy in the Sales and Marketing cube. Other times you might want to add a static value.

The JavaScript itself is not that difficult. The JS will loop through the prompt each time an option is clicked. If the first option is clicked, it will check it and uncheck the other options. If any other option is click it will loop through the prompt, counting the number of checked options and act accordingly. If 0 or all of the options are checked, it will check the first option, otherwise it will simply uncheck it.

When working with Checkbox prompts in JavaScript, the thing to remember is that, for whatever reason, the checkboxes that we see are actually images. To show the prompt as checked, the input needs to have the class “dijitCheckBoxChecked”.

Now the JS:

<script>
/* 
  * Function: addEvent
  * Author: Dan Fruendel
  * Attachs an event or adds an event listener depending on the browser.
  */
var addEvent = function(element, event, func){
    if(element.addEventListener){
      addEvent = function(element, event, func) {
        element.addEventListener(event, func, false);
        return true;
      };
    }
    else if(element.attachEvent) {
      addEvent = function(element, event, func) {
        return element.attachEvent("on" + event, func);
      };
    }
    else {
      addEvent = function(element, event, func) {
        var oldEventHandler = element['on' + event];
        element['on' + event] = function() {
         //using .apply to pass on anything this function gets.
          if(typeof(oldEventHandler) === "function") {
            oldEventHandler.apply(element, arguments);
          }
          func.apply(element, arguments);
        }
        return true;
      };
    }
    addEvent(element, event, func);
  }


// Cognos form and namespace identifier. Don't touch.
var fW = (typeof getFormWarpRequest == "function" ? getFormWarpRequest() : document.forms["formWarpRequest"]); 
if ( !fW || fW == undefined)   {
       fW = ( formWarpRequest_THIS_ ? formWarpRequest_THIS_ : formWarpRequest_NS_ );
   } 
 var preFix = "";
 if (fW.elements["cv.id"]) {     preFix = fW.elements["cv.id"].value;   }
     var nameSpace = "oCV" + preFix;
 
function attacher(elm,prompt,clicked){
  var func = function() {
    //if all is selected, zero out everything else.
    if(clicked==0) {prompt[0].selected=true;prompt[0].checked=true;prompt[0].parentNode.className="dijitInline dijitCheckBox dijitCheckBoxChecked";for(var i=1;i<prompt.length;++i){prompt[i].selected=false;prompt[i].checked=false;prompt[i].parentNode.className="dijitInline dijitCheckBox"}}

    //if individual, count number of selected
    if(clicked>0) {var c=0;
      for(var i=1;i<prompt.length;++i){
        if(prompt[i].checked){++c}
      }
      //if the count of checked is 0, then set the all to checked
      if(c==0) {setter=false;prompt[0].selected=true;prompt[0].checked=true;prompt[0].parentNode.className="dijitInline dijitCheckBox dijitCheckBoxChecked"}
      //if the count of checked is equal to the length of the prompt, then set the all to checked and uncheck everything else
      else if(c==prompt.length-1) {setter=false;prompt[0].selected=true;prompt[0].checked=true;prompt[0].parentNode.className="dijitInline dijitCheckBox dijitCheckBoxChecked";        for(var i=1;i<prompt.length;++i){prompt[i].selected=false;prompt[i].checked=false;prompt[i].parentNode.className="dijitInline dijitCheckBox"}}
      //if the count is one and less than the length of the prompt then just set all to unchecked;
      else if(c>0&&c<prompt.length-1){prompt[0].checked=false;prompt[0].selected=false;prompt[0].parentNode.className="dijitInline dijitCheckBox"}
    }

    canSubmitPrompt();
    }
  addEvent(elm,'click',func)

}

var prompt=fW._oLstChoicesCountries;
for (var i=0;i<prompt.length;++i){
  attacher(prompt[i],prompt,i);
}

</script>

EDIT: An eagle-eyed reader noticed that the appearance of the checks are actually slightly different than they are when first rendered. The solution was to put a parentNode after prompt[i] when calling the className. Thanks Sue!

Checkbox Prompt - All option (1861 downloads)